No-Bake Funfetti Oreo Icebox Cake
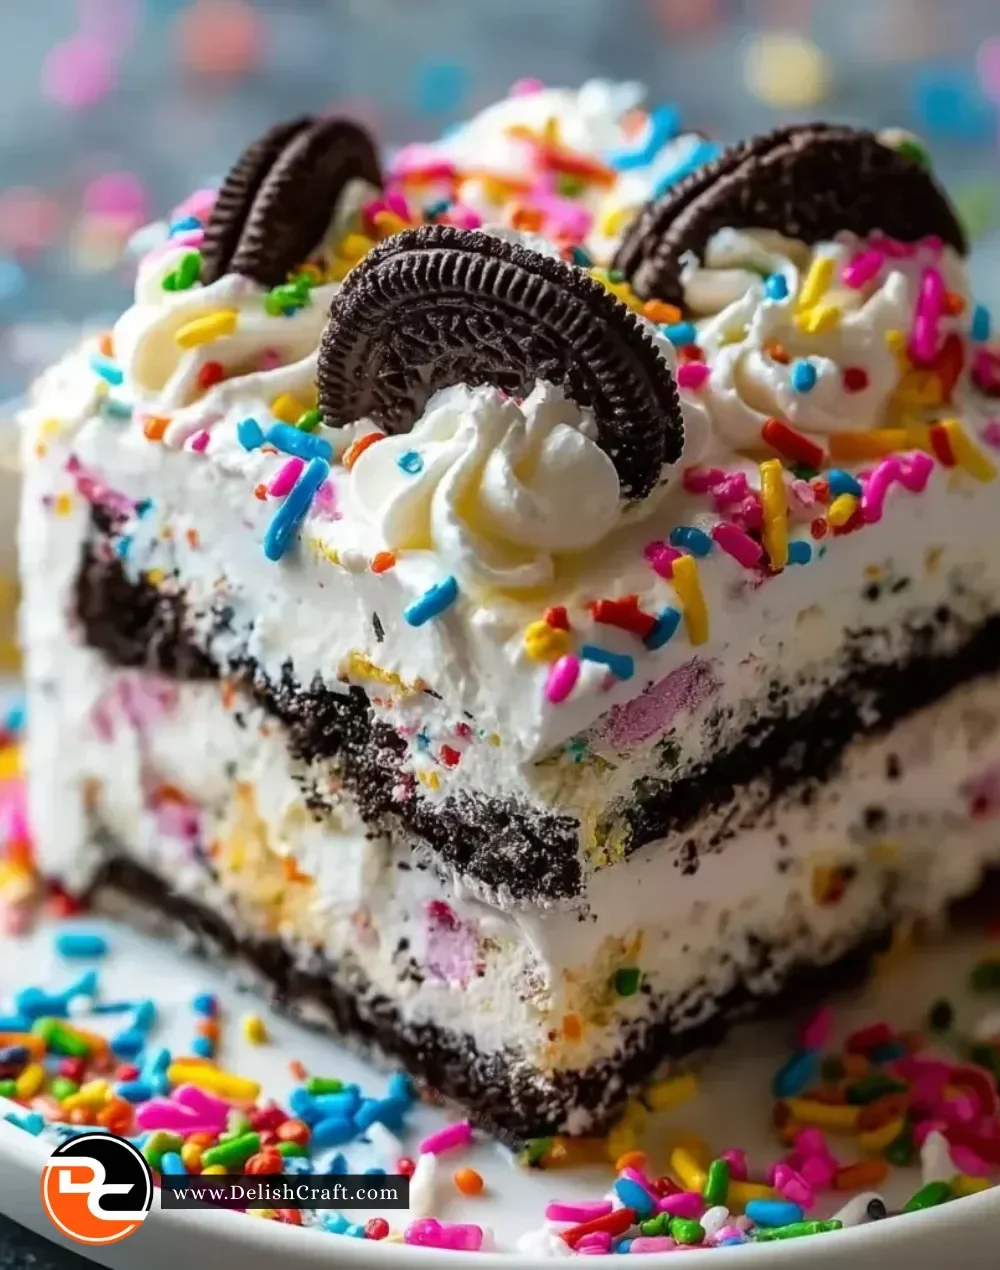
No-Bake Funfetti Oreo Icebox Cake is a delightful dessert that embodies celebration in every bite. Imagine luscious layers of creamy filling and deliciously crisp Oreos, all embellished with a burst of colorful sprinkles. This cake is perfect for birthdays, parties, or just a sweet treat on a warm day. The best part? You don’t need an oven to create this irresistible dessert, making it an excellent choice for busy home cooks or anyone wanting to whip up something special without the heat of baking.
Recipe Information
- Prep Time: 20 minutes
- Cook Time: 0 minutes
- Total Time: 4 hours (includes refrigeration time)
- Servings: 8
- Difficulty Level: Easy
Nutrition Information
- Calories per serving: 360
- Protein: 4 g
- Carbohydrates: 42 g
- Fat: 22 g
- Fiber: 1 g
- Sugar: 18 g
- Sodium: 280 mg
Why Make This No-Bake Funfetti Oreo Icebox Cake
This No-Bake Funfetti Oreo Icebox Cake is not just easy to make; it combines the classic flavors of Oreos and funfetti that everyone loves. The creamy filling balances perfectly with the crunchy texture of the cookies, creating a delightful contrast in each bite. Whether you want to celebrate a special occasion or just enjoy a sweet treat, this cake is as festive as it is delicious. Plus, it requires no baking, meaning you can spend more time enjoying it with friends and family rather than sweating over the oven.
How to Make No-Bake Funfetti Oreo Icebox Cake
Making this No-Bake Funfetti Oreo Icebox Cake is simple and fun! Follow the easy steps below to create layers of deliciousness.
Ingredients:
- 1 package of Oreos
- 1 cup of heavy whipping cream
- 1/3 cup of powdered sugar
- 1 teaspoon of vanilla extract
- 1/2 cup of sprinkles
- 1 package of cream cheese (8 oz)
- 1/2 cup of sugar
- 1 teaspoon of vanilla extract
Directions:
-
Step 1: Preparation
In a bowl, beat the heavy whipping cream, powdered sugar, and vanilla extract until stiff peaks form. This will add a light and airy texture to your cake.
-
Step 2: Mixing
In another bowl, blend the cream cheese, sugar, and vanilla extract until smooth. This creates the rich and creamy filling that pairs perfectly with the Oreos.
-
Step 3: Combining
Gently fold the whipped cream into the cream cheese mixture. Be careful not to deflate the whipped cream; this will keep your filling light and fluffy.
-
Step 4: Layering
Dip each Oreo in milk for a few seconds to soften, then layer them in a dish. Spread a layer of the cream mixture over the Oreos, then sprinkle some funfetti on top. Repeat the layers until all ingredients are used, ending with the cream mixture on top.
-
Step 5: Chilling
Cover and refrigerate for at least 4 hours or overnight. This allows the flavors to meld together and ensures the cake sets properly.
-
Step 6: Garnishing
Before serving, garnish with additional sprinkles and Oreo crumbs to make it extra festive and visually appealing!
How to Serve No-Bake Funfetti Oreo Icebox Cake
This cake is perfect for serving at birthday parties, holiday gatherings, or casual get-togethers. Cut it into squares and serve chilled to showcase its layered beauty. Pair with a scoop of vanilla ice cream or a dollop of whipped cream for an extra indulgent treat!
How to Store No-Bake Funfetti Oreo Icebox Cake
Store any leftovers in an airtight container in the refrigerator for up to 3 days. It’s best enjoyed fresh, but it holds up well to keep the flavors intact for a little while. However, the texture may change after a couple of days, so try to finish it off quickly!
Expert Tips for Perfect No-Bake Funfetti Oreo Icebox Cake
- Use Fresh Ingredients: Always check the dates on your cream cheese and heavy whipping cream for the best results.
- Layer Carefully: To avoid breakage, dip Oreos in milk gently and layer them carefully.
- Customize Your Sprinkles: Choose sprinkles that match your celebration theme for a fun twist!
- Don’t Rush the Chilling: Allow the cake to chill overnight if possible; this enhances the flavor and texture.
Delicious Variations
- Chocolate Lovers Twists: Use chocolate Oreos and chocolate sprinkles to intensify the chocolate flavor.
- Fruit Infused: Mix in fresh fruits like strawberries or blueberries between the layers for a fruity explosion.
- Nutty Crunch: Add crushed nuts like almonds or pecans for an extra textural dimension.
Frequently Asked Questions
-
Can I use a different type of cookie?
Yes! Any crunchy cookie, such as vanilla wafers or graham crackers, can work if you want to change it up. -
What if I don’t have heavy whipping cream?
You can substitute it with cool whip or make your own whipped topping; just ensure it’s thick enough to hold layers. -
Can I make this gluten-free?
Absolutely! Use gluten-free Oreos or other gluten-free cookies for a similar effect. -
How can I make this dairy-free?
Substitute the cream cheese with a dairy-free cream cheese brand and use coconut cream instead of heavy whipping cream. -
Is it necessary to refrigerate before serving?
Yes, refrigerating helps the cake set properly, making it easier to cut and serve.
Conclusion
The No-Bake Funfetti Oreo Icebox Cake is sure to be a hit at your next gathering. Its creamy layers, crunchy texture, and festive sprinkles create a wonderfully satisfying dessert experience. Easy to make and absolutely delicious, this cake is perfect for any occasion. Give it a try, and you might just find it becoming your new go-to sweet treat! Enjoy and happy baking!
Print
No-Bake Funfetti Oreo Icebox Cake
- Total Time: 240 minutes
- Yield: 8 servings 1x
- Diet: Vegetarian
Description
A delightful no-bake dessert featuring layers of creamy filling and crisp Oreos, adorned with colorful sprinkles, perfect for celebrations.
Ingredients
- 1 package of Oreos
- 1 cup of heavy whipping cream
- 1/3 cup of powdered sugar
- 1 teaspoon of vanilla extract
- 1/2 cup of sprinkles
- 1 package of cream cheese (8 oz)
- 1/2 cup of sugar
- 1 teaspoon of vanilla extract
Instructions
- In a bowl, beat the heavy whipping cream, powdered sugar, and 1 teaspoon of vanilla extract until stiff peaks form.
- In another bowl, blend the cream cheese, 1/2 cup of sugar, and 1 teaspoon of vanilla extract until smooth.
- Gently fold the whipped cream into the cream cheese mixture.
- Dip each Oreo in milk for a few seconds, then layer them in a dish. Spread a layer of the cream mixture over the Oreos, and sprinkle some funfetti on top. Repeat layers until all ingredients are used, ending with the cream mixture on top.
- Cover and refrigerate for at least 4 hours or overnight.
- Before serving, garnish with additional sprinkles and Oreo crumbs.
Notes
For best results, allow the cake to chill overnight. Store leftovers in an airtight container for up to 3 days.
- Prep Time: 20 minutes
- Cook Time: 0 minutes
- Category: Dessert
- Method: No-Bake
- Cuisine: American
Nutrition
- Serving Size: 1 serving
- Calories: 360
- Sugar: 18g
- Sodium: 280mg
- Fat: 22g
- Saturated Fat: 12g
- Unsaturated Fat: 10g
- Trans Fat: 0g
- Carbohydrates: 42g
- Fiber: 1g
- Protein: 4g
- Cholesterol: 30mg