Minnie Mouse Cake
There’s something undeniably magical about baking a cake, especially when it’s inspired by one of the most beloved characters of all time—Minnie Mouse! As a child, few things thrilled me more than attending birthday parties adorned with fluffy treats and joyful decorations. Now, as a food blogger, I aim to recreate that childlike wonder in my own kitchen. Baking a Minnie Mouse cake is not just about the delicious layers; it’s about evoking nostalgia and creating new memories with family and friends. So, let’s channel our inner child and bring this delightful cake to life!
Recipe Timing
- Prep Duration: 30 minutes
- Active Cooking: 30 minutes
- Total Duration: 1 hour and 30 minutes
- Portion Size: Serves 8-10
- Complexity: Moderate
Nutritional Recipe
- Calories per portion: Approximately 450 kcal
- Protein: 5g
- Carbs: 60g
- Fats: 22g
- Fiber: 0g
- Sugars: 30g
- Sodium: 200mg
Why You’ll Love This Minnie Mouse Cake
This Minnie Mouse cake is a breeze to make and even more delightful to decorate. The combination of soft, buttery cake layers paired with smooth buttercream frosting creates a light and fluffy texture. Plus, the vibrant fondant decorations add an enchanting flair that will make any occasion feel special—from birthday celebrations to tea parties. The smiles on your loved ones’ faces as they see this cheerful cake will be priceless.
The Complete Cooking Journey
Let’s embark on a delightful cake-making adventure that will fill your kitchen with warmth and sweetness. From the mixing bowl to the final touches of decoration, each step is a chance to connect with your inner baker. Get ready to preheat your oven and prepare for some fun!
Ingredients:
- 2 cups all-purpose flour
- 2 cups granulated sugar
- 1 cup unsalted butter, softened
- 4 large eggs
- 1 cup milk
- 2 teaspoons vanilla extract
- 1 tablespoon baking powder
- 1/2 teaspoon salt
- Red fondant
- Black fondant
- White fondant
- Edible black marker
- Buttercream frosting
Method:
Step 1: Preheat the Oven
Preheat your oven to 350°F (175°C). Grease and flour two round cake pans to ensure an easy release once baked.
Step 2: Cream Butter and Sugar
In a large mixing bowl, cream together the softened butter and sugar until light and fluffy. This step creates the base for your cake, infusing it with sweetness and a lovely texture.
Step 3: Incorporate the Eggs
Add in the eggs one at a time, mixing well after each addition. This ensures that the eggs are fully integrated, creating a smooth batter.
Step 4: Add Milk and Vanilla
Stir in the milk and vanilla extract, bringing moisture and flavor to the batter. The aroma of vanilla will surely delight your senses!
Step 5: Combine Dry Ingredients
In a separate bowl, combine the flour, baking powder, and salt. Gradually add the dry ingredients to the wet ingredients, mixing until just combined to avoid overworking the batter.
Step 6: Divide the Batter
Divide the batter evenly between the prepared cake pans. A food scale can help ensure accuracy, producing evenly layered cakes.
Step 7: Bake the Cakes
Bake for 25-30 minutes or until a toothpick inserted in the center comes out clean. Take a moment to relish the fragrant scent wafting through your kitchen.
Step 8: Cool the Cakes
Allow the cakes to cool completely in the pans before transferring to a wire rack. This step is crucial for easy frosting later on.
Step 9: Level the Cakes
Once cooled, level the tops of the cakes if necessary, making them easier to stack and providing a beautiful presentation.
Step 10: Layer the Cakes
Stack the cakes with a generous layer of frosting between each one, then frost the entire outside. A spatula can help create smooth edges.
Step 11: Create Minnie’s Bow
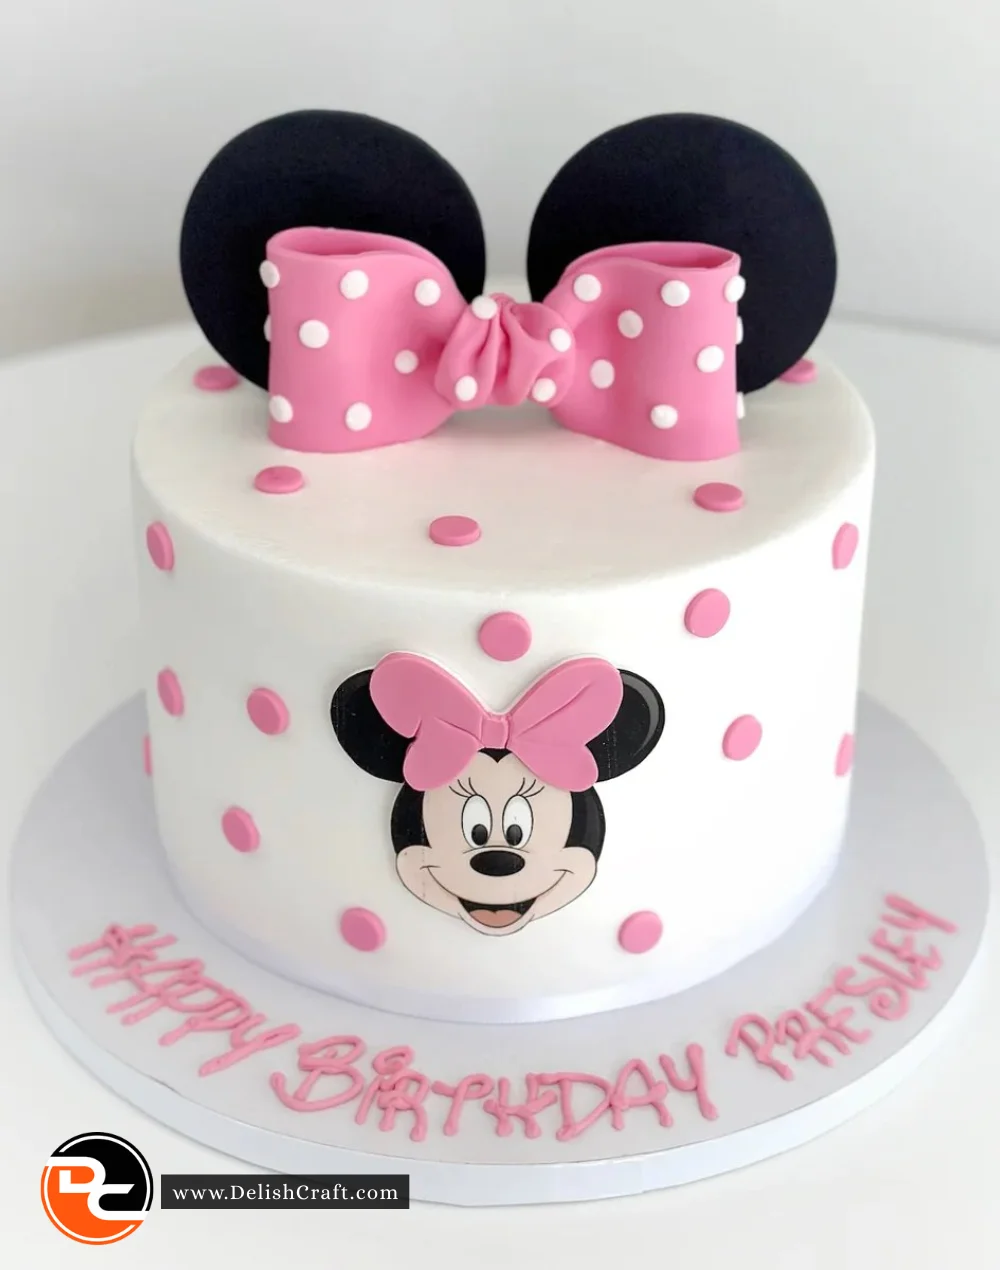
Roll out the red fondant and cover the top layer of the cake to create Minnie’s iconic bow. Don’t worry if it’s not perfect; every bow has its charm!
Step 12: Shape the Ears
Use black fondant to shape ears and attach them on top of the cake, giving Minnie her signature look. Secure them gently for a cute finish.
Step 13: Add Details
Use white fondant for additional details and an edible black marker for facial features, bringing Minnie Mouse to life right before your eyes!
Step 14: Serve and Enjoy
Your Minnie Mouse cake is ready to impress! Slice, serve, and savor every moment as your loved ones dig into this enchanting creation.
Serving Suggestions & Pairings
This delightful Minnie Mouse cake pairs wonderfully with a scoop of vanilla ice cream or a fresh fruit salad. For beverages, consider serving it with fruity punch, hot cocoa, or a light sparkling drink. This cake is the star of the show, making it perfect for themed parties or a family fun night!
Storage & Leftovers Guide
Store any leftover cake in an airtight container at room temperature for up to 3 days or in the fridge for up to a week. If you want to keep it longer, wrap it tightly in plastic wrap and freeze for up to a month. Just remember to thaw it overnight in the fridge before serving!
Kitchen Wisdom & Success Tips
- Check for Doneness: Ovens can vary in temperature, so keep an eye on your cakes during baking. The toothpick test is your best friend!
- Fondant Tricks: To make rolling fondant easier, dust your surface with cornstarch. If the fondant is sticky, a touch of kneading may help.
- Smooth Edges: Use a bench scraper or a spatula to achieve smooth edges while frosting for a professional look.
Flavor Variations & Adaptations
Feel free to play with flavors! Add cocoa powder to the batter for a delicious chocolate version or introduce lemon zest for a zesty twist. Your Minnie Mouse cake can take on various personalities that suit any palate.
Reader Questions & Solutions
-
How do I ensure my cake stays moist?
- Make sure not to over-bake your cake, as this can lead to dryness. Adding a little more milk can help keep it moist, as well!
-
Can I use a different type of fondant?
- Yes! While traditional fondant works great, you can also use modeling chocolate for a different texture.
-
What if my cakes domed while baking?
- This can happen sometimes. Just level them off with a serrated knife and they’ll be perfect for stacking!
-
How can I make my frosting less sweet?
- Add a pinch of salt or reduce the sugar slightly. Using cream cheese frosting can also balance the sweetness nicely.
-
Can I make this cake chocolate-flavored?
- Absolutely! Just substitute 1/2 cup of flour with cocoa powder to achieve that chocolate goodness.
Wrapping Up
Baking a Minnie Mouse cake is more than just a recipe; it’s a journey filled with fun and fond memories. Whether you’re whipping this up for a special occasion or just for a fun afternoon, remember that the heart of any dish is the love you put into it. So, gather your ingredients, roll up your sleeves, and let’s create some magic in the kitchen! Happy baking! 🎂✨
Print
Minnie Mouse Cake
- Total Time: 90
- Yield: 8-10 servings 1x
- Diet: Vegetarian
Description
A delightful cake inspired by Minnie Mouse, perfect for birthday celebrations and bringing joyful nostalgia to your kitchen.
Ingredients
- 2 cups all-purpose flour
- 2 cups granulated sugar
- 1 cup unsalted butter, softened
- 4 large eggs
- 1 cup milk
- 2 teaspoons vanilla extract
- 1 tablespoon baking powder
- 1/2 teaspoon salt
- Red fondant
- Black fondant
- White fondant
- Edible black marker
- Buttercream frosting
Instructions
- Preheat your oven to 350°F (175°C). Grease and flour two round cake pans.
- Cream together the softened butter and sugar until light and fluffy.
- Add the eggs one at a time, mixing well after each addition.
- Stir in the milk and vanilla extract.
- In a separate bowl, combine the flour, baking powder, and salt. Gradually add to the wet ingredients.
- Divide the batter evenly between the prepared cake pans.
- Bake for 25-30 minutes or until a toothpick inserted comes out clean.
- Allow the cakes to cool completely before transferring to a wire rack.
- Level the tops of the cakes if necessary.
- Stack the cakes with frosting between each one and frost the entire outside.
- Roll out the red fondant and cover the top layer for Minnie’s bow.
- Use black fondant to shape ears and attach on top of the cake.
- Add white fondant details and draw with the edible black marker.
- Serve and enjoy your delightful Minnie Mouse cake!
Notes
Store leftover cake in an airtight container at room temperature for up to 3 days or in the fridge for up to a week.
- Prep Time: 30
- Cook Time: 30
- Category: Dessert
- Method: Baking
- Cuisine: American
Nutrition
- Serving Size: 1 slice
- Calories: 450
- Sugar: 30g
- Sodium: 200mg
- Fat: 22g
- Saturated Fat: 12g
- Unsaturated Fat: 8g
- Trans Fat: 0g
- Carbohydrates: 60g
- Fiber: 0g
- Protein: 5g
- Cholesterol: 70mg